Versions Compared

Key

  • This line was added.
  • This line was removed.
  • Formatting was changed.


Excerpt

Overview

One of the most important features of Automation Toolbox for Jira is the easy accessibility to Jira data stored in system fields, custom fields and a significant number of other, virtual fields that are made available by the Automation Toolbox for Jira implementation. You can access, validate, do mathematical calculations and manipulate the values found in these fields through the use of field codes.  These codes are unique identifiers (keys) to all available fields.

Automation Toolbox for Jira uses field codes in triggers, conditions, selectors, and actions:

  • normal custom fields
  • system fields
  • parent fields available to all sub-tasks
  • issue, project and user properties

Field codes are not only used as unique field identifiers, but they are also an important safety feature for the Jira instance. Custom fields, for instance, can be renamed and the names do not have to be unique, but using Automation Toolbox for Jira field codes make the fields you use in your rules immune to renaming. 

You can choose the appropriate field codes by using the drop-down lists that Automation Toolbox for Jira makes available wherever expressions can be used. 


Field code notation

Depending on the context in which they are being used, field codes will contain a prefix following this notation{origin.field/data}.

Available contexts (or origins) in Automation Toolbox for Jira are:

ContextDescription

Trigger

The issue, user, version, component or project event that triggers the execution of the rule.

Selector

The issue currently being processed by the selector. (e.g. an issue returned by a JQL query).

(info) Selectors usually hold multiple issues. They will processed iteratively one by one.

System

Some data does not have an issue context (e.g. the currently logged in user or the system date and time)


The prefix, denoting the origin (where the data should be read from / written to), is a referential part of the field code and will be inserted into the expression whenever you select a field from a dropdown list (as shown below).   

Multimedia
nameentering_parser_field_codes - cut.mp4
width700

 
Here are some examples:  

  • %{trigger.issue.description}
  • %{trigger.parent.summary}
  • %{trigger.project.lead}
  • %{selector.issue.cf10021}
  • %{system.currentUser}


Field codes for Jira standard or system fields will display the attribute in a legible form like %{trigger.issue.summary}.

Info

All selected custom fields will be notated like this %{trigger.issue.cfnnnnn} where nnnnn contains the Jira custom field id.
Once an expression has been saved, the real name will be displayed in the configuration element.

The purpose of using the cfnnnnn notation is quite simple - custom fields can be renamed .


Field codes: 
Status
colourYellow
titlestring
 vs. 
Status
colourBlue
titlenumber

Field codes must always be enclosed by curly brackets (or braces) but if they are used for text-strings, the brackets must be preceded by a percent sign %

Status
colourBlue
titleNumber
 or Date-Time fields can be referenced as numbers using the following notation: {somenumberfield}. ((info) no preceding % sign)

Status
colourYellow
titlestring
 Any field type or data type is susceptible of being transformed to text, so any field can be referenced as a text-string value using the following notation: %{somefield}.

Cascading Select or Multi-Cascading Select fields, where i is the index that represents the level to be accessed. (i = 0 is used for base level) are notated as %{somefield.i} .

Tip

A full list of available data types can be found here.


Field codes in the documentation

Wherever field codes are used in the documentation they will be notated with three periods (...)  instead of prefixes. 
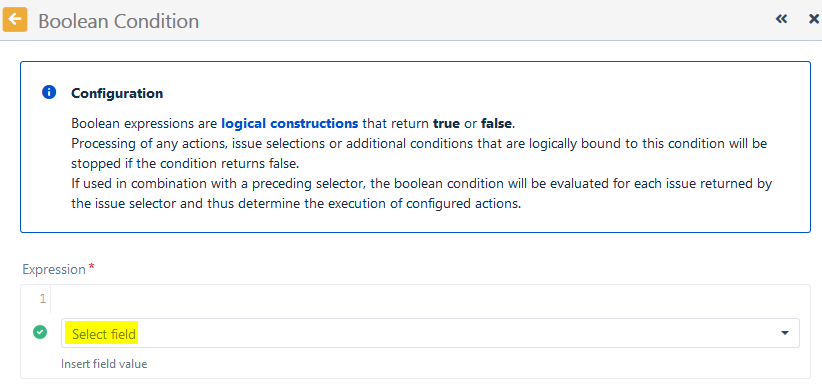
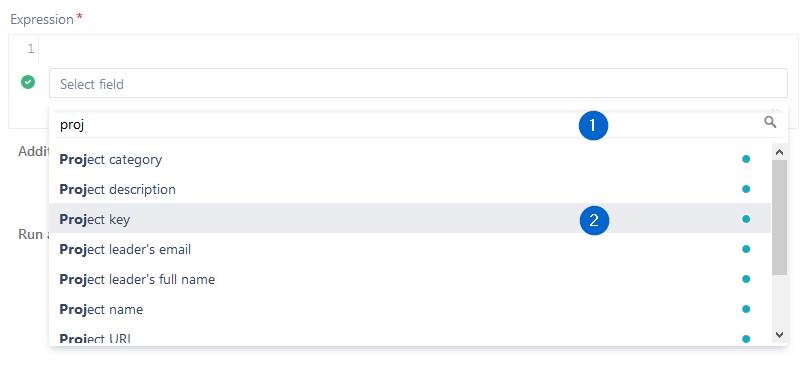
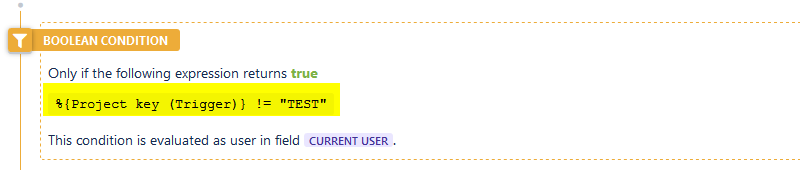
  • %{...summary} 
  • %{...cf10021}
  •   {...duedate}


Example of using field codes

The example below shows and expression usage in a Boolean Condition.

Expand


Click on Select field and then


1 - start typing the name of the field you wish to insert
2 - click on one of the fields provided in the drop-down list


The chosen field code will then be inserted into your parser expression where you can then enhance the expression with more
fields or any other methods the expression parser allows.

The expression syntax will be evaluated as you create the expression. If the syntax is correct, a green check circle will appear.  


In the above examples, we've chosen to add a Boolean Condition validating that the Project key of the issue being processed is not (!=) TEST.

After you save the function, the real field names will be displayed in the rule element.


In contrast to system or ATJ special virtual fields (which cannot be renamed), custom fields will be inserted into an expression with
a different notation as seen below:


In this example, we've chosen the custom field "Sale Amount" to evaluate. In the expression, it is notated as cf10900. 10900 is
the unique field id in the Jira configuration.

Once the element is saved, it appears with its real name.  


If at some point the field should be renamed i.e. Sale Amount Net, the expression will stay the same, but the element will now
display the new name and the rule does not need to be updated.    


For more detailed information on field availability and parser usage, please see the section on Virtual fields.


CSS Stylesheet
#tocContainer {
margin-right: 15px; 
position: fixed;
right: 0;
top: 160px;
width: 23%;
z-index: 1;
}


Div
styleline-height: 150%;
idtocContainer


Panel
borderColor#333f48
bgColor#FFFFFF
titleColor#eeeeee
borderWidth1
titleBGColor#333f48
borderStylesolid
titleOn this page

Table of Contents
maxLevel3
indent20px
classp